

The Security Risks of Shared and Static Kubeconfigs
In my years of auditing cloud-native infrastructure, few security anti-patterns remain as stubbornly persistent as the distribution of static, long-lived kubeconfig files for human operators. When organizations spin up self-hosted Kubernetes clusters—whether on-premises, in colocation facilities, or as bare-metal deployments in public clouds—they often default to distributing administrative certificates or service account tokens. This approach is a ticking time bomb. It bypasses central identity management, lacks granular auditability, and makes credential revocation an operational nightmare.
To establish a robust security posture, human access to Kubernetes must be tied directly to your enterprise Identity Provider (IdP) using OpenID Connect (OIDC). However, implementing OIDC for a command-line tool like kubectl introduces a distinct architectural challenge. Unlike a web application running on a secure server, a CLI tool running on a developer's local workstation cannot securely store a client secret. It is, by definition, a "public client."
I recommend standardizing human access to self-hosted Kubernetes clusters using public OIDC clients and Proof Key for Code Exchange (PKCE). This model secures the authentication loop, allows for clean configuration of the Kubernetes control plane, and provides manageable operational trade-offs across your engineering organization.
When you bootstrap a cluster using tools like kubeadm, the default administrative credential is a client certificate signed by the cluster's internal Certificate Authority (CA). These certificates are incredibly powerful: they bypass the API server's authentication webhook mechanisms, grant unrestricted administrative access, and—crucially—cannot be easily revoked. The Kubernetes API server does not natively support Certificate Revocation Lists (CRLs) or the Online Certificate Status Protocol (OCSP). If an administrator's local kubeconfig containing a client certificate is compromised, the only way to invalidate that credential is to rotate the entire cluster CA, which invalidates every certificate across the control plane and node components, causing massive operational disruption.
To circumvent the revocation issue, some teams resort to distributing long-lived Service Account tokens to human users. While Service Accounts can be deleted to revoke access, they are explicitly designed for machine-to-machine communication, not human identity. Using them for humans breaks the principle of least privilege and destroys the audit trail. When an action is logged in the Kubernetes audit log, it appears under the name of the Service Account, not the actual human operator who initiated the command. This makes post-incident forensics nearly impossible.
Centralizing authentication through an enterprise IdP (such as Okta, Entra ID, Keycloak, or Ping Identity) solves these issues. It ensures that when an employee leaves the company or changes roles, their access to the cluster is terminated instantly at the identity source. It also allows you to enforce Multi-Factor Authentication (MFA) and device compliance policies at the time of login. The challenge lies in safely executing this integration from a local terminal session.
Architectural Mechanics: Public OIDC Clients and PKCE in Kubernetes
In the OAuth 2.0 and OIDC frameworks, clients are categorized based on their ability to maintain a secret securely:
- Confidential Clients: These are applications running on protected servers (e.g., a backend web service) where the client secret can be stored in an environment variable or secret manager, shielded from the end-user.
- Public Clients: These are applications running on devices controlled by the end-user (e.g., single-page web apps, mobile apps, or CLI tools like
kubectl). Because the binary runs on the user's local machine, any embedded client secret can be extracted via reverse engineering or memory inspection. Therefore, public clients must never use client secrets.
Historically, authenticating a public client via the standard Authorization Code flow carried a significant vulnerability: authorization code interception. In this attack vector, a malicious application running on the user's device could intercept the authorization code returned by the IdP to the local redirect URI (often a loopback address like http://localhost:8000) and exchange it for tokens.
To mitigate this risk, RFC 7636 introduced Proof Key for Code Exchange (PKCE). PKCE dynamically binds the authorization code to the specific client instance that initiated the request using a transient cryptographic secret. The mechanism operates through three distinct phases:
- The Cryptographic Challenge Generation: When you run a command requiring authentication, the local OIDC helper tool (such as the open-source
kubeloginplugin) generates a high-entropy, cryptographically secure random string called thecode_verifier. It then hashes this string using SHA-256 and URL-safe Base64 encodes the result to produce thecode_challenge. - The Authorization Request: The helper tool starts a temporary local web server and opens the user's default web browser, directing it to the IdP's authorization endpoint. This request includes the
code_challengeand the challenge method (S256). The IdP authenticates the user, records the challenge, and redirects the browser back to the local loopback server with an authorization code. - The Secure Token Exchange: The helper tool extracts the authorization code from the redirect and sends a direct POST request to the IdP's token endpoint. Crucially, this request contains the original plaintext
code_verifier. The IdP hashes this verifier using SHA-256 and compares it to thecode_challengeit received in step two. If they match, the IdP proves that the entity requesting the tokens is the exact same entity that initiated the login process, and it issues the ID, Access, and Refresh tokens.
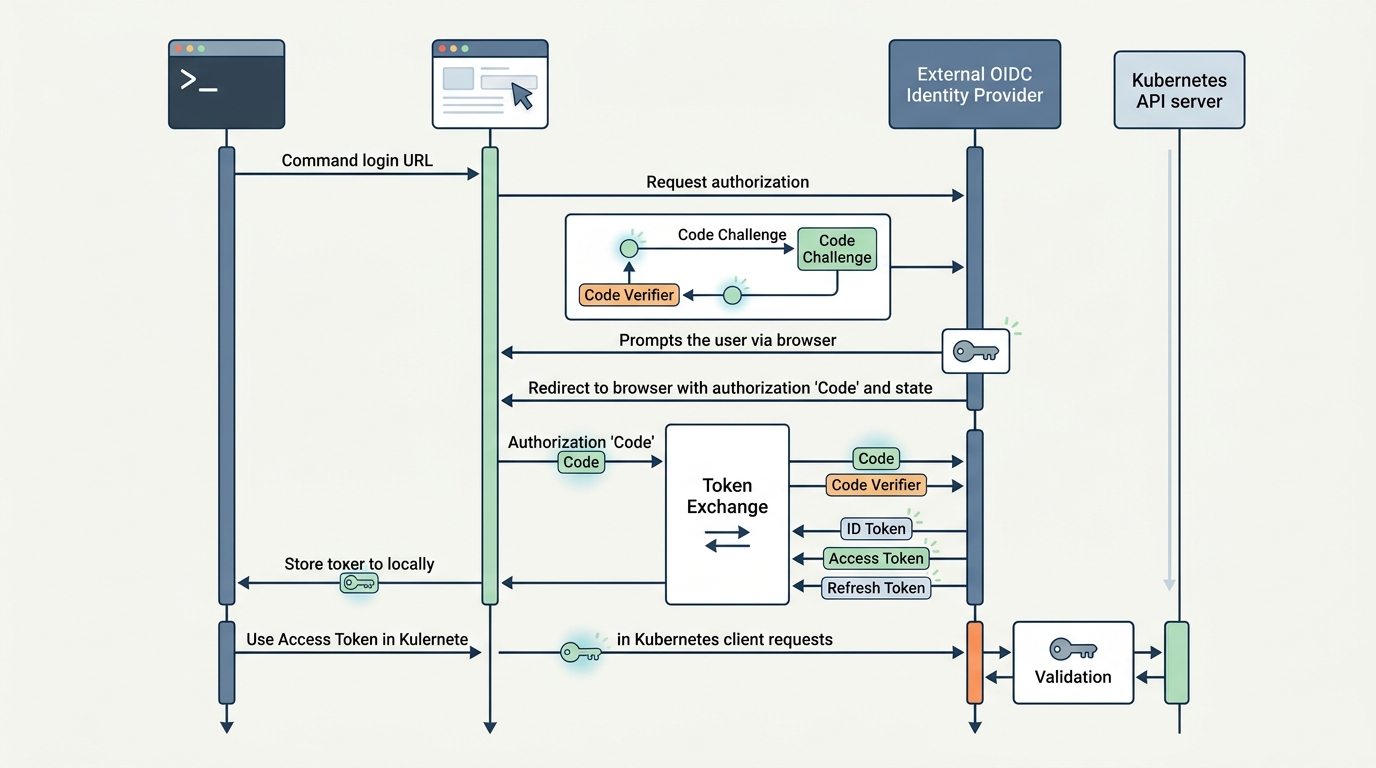
Once the helper tool obtains the ID token, it hands it off to kubectl. The ID token is a JSON Web Token (JWT) containing cryptographically signed claims about the user's identity, such as their username and group memberships. kubectl includes this JWT in the Authorization: Bearer <token> header of every subsequent request to the Kubernetes API server.
When the Kubernetes API server receives the request, it does not contact the IdP to validate the token. Doing so for every API call would introduce unacceptable latency and a single point of failure. Instead, the API server validates the JWT locally. It uses the public keys published by the IdP at its JSON Web Key Set (JWKS) endpoint to cryptographically verify the token's signature, confirm that the token has not expired, and verify that the audience (aud) claim matches the configured client ID. Once validated, the API server extracts the username and group claims and maps them to Kubernetes Role-Based Access Control (RBAC) policies to authorize the request.
Step-by-Step Implementation: Configuring kube-apiserver and Client-Side Flow
To implement this architecture, you must configure both the control plane and the client workstations. Below, I outline the configuration steps for both sides.
1. Control Plane Configuration
You must configure the kube-apiserver with specific flags to enable OIDC token validation. In a self-hosted environment, these flags are typically added to the static pod manifest located at /etc/kubernetes/manifests/kube-apiserver.yaml on each control plane node.
I recommend using the following production-grade configuration block:
apiVersion: v1
kind: Pod
metadata:
  name: kube-apiserver
  namespace: kube-system
spec:
  containers:
  - command:
    - kube-apiserver
    - --oidc-issuer-url=https://identity.example.com/oauth2/default
    - --oidc-client-id=kubernetes-cli
    - --oidc-username-claim=email
    - --oidc-username-prefix=oidc:
    - --oidc-groups-claim=groups
    - --oidc-groups-prefix=oidc:
    - --oidc-signing-algs=RS256
    - --oidc-ca-file=/etc/kubernetes/pki/idp-ca.crt
    volumeMounts:
    - mountPath: /etc/kubernetes/pki/idp-ca.crt
      name: idp-ca
      readOnly: true
  volumes:
  - hostPath:
      path: /etc/kubernetes/pki/idp-ca.crt
      type: File
    name: idp-ca
Let me explain the critical architectural decisions behind these flags:
--oidc-username-prefixand--oidc-groups-prefix: I strongly advise prefixing claims (e.g., withoidc:). This prevents naming collisions with local system accounts or other authentication providers, ensuring that an OIDC group namedadmincannot accidentally inherit the privileges of the default system cluster-admin group.--oidc-signing-algs: Explicitly restricting this toRS256(orES256if supported by your IdP) prevents token signature bypass attacks where a malicious actor attempts to use thenonealgorithm.--oidc-ca-file: If your self-hosted environment uses an internal PKI to secure the IdP, the API server must trust the signing CA. You must mount this CA certificate into the API server container.
2. Client-Side Configuration
On the client side, users must install kubectl and the kubelogin plugin (often distributed via package managers as oidc-login). The kubeconfig file must be structured to invoke kubelogin as an credential exec plugin. This allows kubectl to automatically trigger the PKCE flow when the cached token expires.
Here is a standardized client-side kubeconfig template:
apiVersion: v1
kind: Config
clusters:
- cluster:
    certificate-authority-data: LS0tLS1CRUdJTiBDRVJUSUZJQ0FURS0tLS0t... # Cluster CA
    server: https://kubernetes-api.example.com:6443
  name: production-cluster
contexts:
- context:
    cluster: production-cluster
    user: oidc-user
  name: production
current-context: production
users:
- name: oidc-user
  user:
    exec:
      apiVersion: client.authentication.k8s.io/v1beta1
      command: kubectl-oidc_login
      args:
      - get-token
      - --oidc-issuer-url=https://identity.example.com/oauth2/default
      - --oidc-client-id=kubernetes-cli
      - --oidc-use-pkce
      - --oidc-extra-scope=offline_access
      - --oidc-extra-scope=profile
Note the inclusion of --oidc-use-pkce. This flag instructs kubelogin to execute the PKCE handshake. The --oidc-extra-scope=offline_access argument requests a refresh token from the IdP. This is a critical usability feature: it allows kubelogin to silently refresh expired ID tokens in the background without prompting the user to open a browser and log in every hour.
Operational Trade-offs, Edge Cases, and Enterprise Governance
While public OIDC with PKCE represents the gold standard for human access to Kubernetes, implementing it at scale requires navigating several operational trade-offs and edge cases.
Comparing Authentication Strategies
To contextualize this architecture, let us compare the primary authentication strategies available for self-hosted Kubernetes environments:
| Feature / Vector | Static Client Certificates | Confidential OIDC Client (via Proxy) | Public OIDC Client with PKCE |
|---|---|---|---|
| Revocation Mechanism | None (Requires CA Rotation) | Instant (at IdP level) | Instant (at IdP level) |
| Audit Trail Quality | Poor (Anonymous/Shared) | Excellent (User-specific) | Excellent (User-specific) |
| Client Secret Storage | N/A (Uses private key) | High Risk (Secret on CLI) | Zero Risk (No secret used) |
| Network Dependency | None (Self-contained) | Proxy must reach IdP | API Server must reach IdP JWKS |
| User Experience | Seamless but insecure | Complex configuration | Seamless (Silent background refresh) |
Token Lifetimes and Session Revocation
One of the most common friction points is balancing security with user experience regarding token expiration.
If you set the ID token lifetime too short (e.g., 15 minutes) and do not issue refresh tokens, developers will face constant browser redirection, disrupting their workflow. Conversely, if you issue long-lived refresh tokens, you must ensure you have a mechanism to revoke those sessions if a device is lost or stolen.
When a user's session is revoked at the IdP, their refresh token is invalidated. The next time kubelogin attempts to use that refresh token to request a new ID token, the IdP will reject the request, forcing the user to re-authenticate. However, keep in mind that the active ID token (the JWT) is stateless. If an ID token has a 1-hour expiration, it will remain valid for access to the Kubernetes API server for the remainder of that hour, even if the user is disabled in the IdP immediately after token issuance. If your security policy requires instantaneous revocation, you must configure short ID token lifetimes (e.g., 5 to 10 minutes) and rely on frequent, silent background refreshes via PKCE.
Network Topology and Air-Gapped Clusters
In self-hosted environments, clusters are frequently deployed within isolated network zones or strictly air-gapped data centers. This introduces a major architectural hurdle: the Kubernetes API server must be able to resolve and connect to the IdP's JWKS endpoint to fetch the public signing keys.
If your API server cannot access the public internet to reach a cloud-hosted IdP (like Okta or Entra ID), you have three options:
- Local Identity Federation: Deploy a local, self-hosted OIDC provider (such as Keycloak or Dex) inside your secure network boundary. This local provider can federate upstream to your primary enterprise IdP using secure network paths, while serving as the local JWKS source for the Kubernetes API server.
- Static JWKS Local Mirroring: While not officially supported by standard OIDC flags, some platform teams configure local reverse proxies or caching layers that serve the IdP's JWKS file locally within the air-gapped network. This requires careful management of key rotation.
- OIDC Webhook Authenticator: Instead of configuring the API server's native OIDC flags, you can deploy an external authentication webhook that handles token validation. This webhook can run in a DMZ or a network zone that has access to both the internal API server and the external IdP.
RBAC Mapping and Group Governance
Once authentication is successful, authorization is governed by Kubernetes RBAC. To manage this cleanly, you should avoid binding roles directly to individual usernames. Instead, bind ClusterRoles and Roles to OIDC groups.
For example, if your IdP returns a group claim containing engineering-admin, you should create a corresponding ClusterRoleBinding within the cluster:
apiVersion: rbac.authorization.k8s.io/v1
kind: ClusterRoleBinding
metadata:
  name: oidc-engineering-admins
subjects:
- kind: Group
  name: oidc:engineering-admin # Matches the prefixed group claim
  apiGroup: rbac.authorization.k8s.io
roleRef:
  kind: ClusterRole
  name: cluster-admin
  apiGroup: rbac.authorization.k8s.io
This architecture ensures that access control is entirely declarative and managed at the identity source. Adding a user to the engineering-admin group in your enterprise directory automatically provisions administrative access to the Kubernetes cluster on their next login, without requiring any modifications to the cluster itself.
Conclusion
Transitioning from static, certificate-based access to a public OIDC client model with PKCE is one of the most impactful security upgrades you can implement for a self-hosted Kubernetes cluster. By eliminating long-lived credentials, you close a massive attack vector, establish an immutable audit trail, and simplify compliance audits.
To execute this transition successfully, I recommend the following immediate actions:
- Audit your current access patterns: Identify all distributed
kubeconfigfiles and catalog who has access to administrative certificates. - Register a public OIDC client: Create a new client application in your enterprise IdP, ensuring it is configured as a public client (no client secret) with the authorization code flow, PKCE enabled, and the redirect URI set to
http://localhost:8000(and other local ports as needed by your CLI helper). - Test in a staging environment: Apply the OIDC flags to a non-production control plane, configure a local
kubeconfigwith thekubeloginplugin, and verify that the PKCE flow successfully authenticates your terminal session. - Define clear RBAC mappings: Align your internal directory groups with Kubernetes Roles and ClusterRoles before rolling the configuration out to production.
By standardizing on this modern, identity-centric architecture, you ensure that human access to your infrastructure remains secure, auditable, and operationally sustainable.